Assignment 4 (System calls)
due 23 March at noon
To retrieve the files, just do an svn update again, and the a4
folder should appear.
$ cd ~/cs643
$ svn update
At revision 183
Table of Contents
1 Run GeekOS user programs
This version of GeekOS is much more sophisticated than the last
one. It can read a very simple file system, load programs from it, and
execute them in user mode. The programs are in the a4/src/user/
sub-folder. In this section, you will edit and run user programs, and
then investigate the limitations of user mode.
-
First, build the kernel and user programs. The first time, this
may take quite a while, because our kernel has grown significantly
in size and complexity since the last assignment. As it nears
completion, it may ask for your
adminuserpassword again, to mount thecs643hostfolder from your host OS. Below is some of the expected output. When it finishes, you should see the filesfd.imganddiskc.vdiin yourcs643hostfolder.$ cd ~/cs643/a4/build $ make [...] sudo mount -t vboxsf -o uid=`id -u` host /mnt/host && touch /mnt/host/.exists [sudo] password for adminuser: cat geekos/fd_boot.bin geekos/setup.bin geekos/kernel.bin > fd.img cp fd.img /mnt/host [...] file work.exe starts at block 235 putting the directory at sector 161 cat vdi-header diskc.img >diskc.vdi cp diskc.vdi /mnt/host rm libc/entry.o $
-
Before starting GeekOS, we need to ask VirtualBox to use
diskc.vdias a virtual C drive. From the VirtualBox file menu, select Virtual Media Manager. Then selectAdd. Navigate to yourcs643hostfolder and select thediskc.vdifile. ClickOKto dismiss the media manager. -
Now single-click
geekosin the VirtualBox machine list, and then click the Settings toolbar button. Select Storage tab and find the icon to add a new hard disk. Click it, and then make sure the new hard disk is set todiskc.vdi. Dismiss the settings dialog.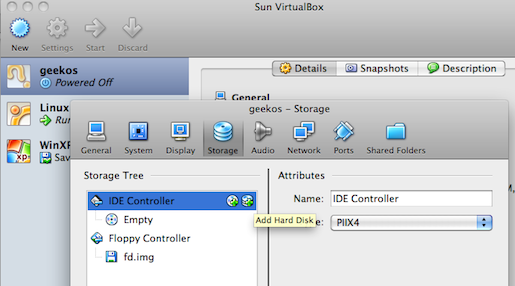
-
Start the
geekosvirtual machine. You should see the kernel initialize itself (make sure it saysMounted /c filesystem!– that's your indication that the previous steps worked), and then give you a shell prompt. Yes, this version of GeekOS has a very simple command-line shell, running in user mode. It can start up other user mode programs that we write.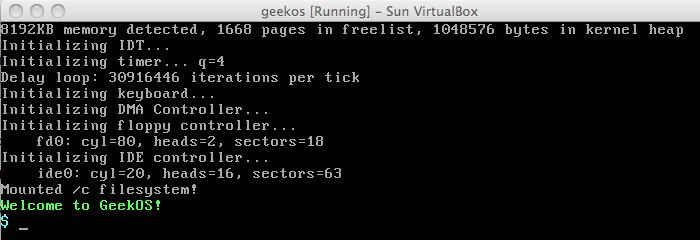
-
Type
helloat the prompt and hit enter. When you do this, the shell looks for a program on the (virtual!)/cfilesystem calledhello.exe. This program was created by our build scripts from the source code ina4/src/user/hello.c. -
Open
hello.cnow in your editor. It includes two header files:conio.handprocess.h. These are libraries that GeekOS provides so that user programs know how to make system calls into the kernel. We'll explore that more in the next part. Thehelloprogram contains calls toPrint()andGetPID(). Both of these ultimately make system calls (software interrupts) into the kernel to do the real work. Remember: user-mode processes are not allowed to access the hardware and system memory directly.#include <conio.h> #include <process.h> int main(int argc, char* argv[]) { int my_pid = Get_PID(); Print("Hello, world!\n"); Print("My process ID is %d\n", my_pid); return 0; } -
Change the program so that, instead of printing “Hello, world!” it
prints a personal greeting to you, such as “Hello, Chris!” Rebuild
everything, run it in VirtualBox again, and type
helloat the prompt. You should see your personalized greeting. -
Now, we're going to be devious and try to access the system
hardware directly from a user program. Remember in the first
assignments, when we accessed video memory using
VIDMEM[i]? That was okay because it was part of the kernel. But let's try to do that from user mode, and see what happens… -
Add the following two macros to
hello.c(somewhere near the top, doesn't really matter):#define VIDMEM_ADDR 0xb8000 #define VIDMEM ((uchar_t*) VIDMEM_ADDR)
-
Then, inside
main, just before thereturn, add the following code:VIDMEM[0] = 'A';
-
This, of course, will attempt to write the character 'A' in the
upper left corner of the screen. But it bypasses the kernel and
talks directly to the hardware! Rebuild and run your
helloprogram again. Does the 'A' show up? What happened, and why? Type up a short explanation as a comment inhello.c, and commit this along with your other changes to the code.
2 Add system calls
Now, we're going to add two new system calls to GeekOS. They work
similarly to Get_PID(), which you saw already in hello.c. Remember
that the machine has a timer that sends an interrupt periodically; we
call each interrupt a ‘tick’. On a normal PC, the interrupt comes
something like 100 times per second. (On a virtual machine, it could
be slower.) At any rate, all of our time-keeping will be in units of
the number of ticks.
Each time the timer interrupt occurs, the handler increments a global
tick counter g_numTicks, so this is pretty much just like a wall
clock that keeps track of how much time passes. Also, the process
control block (PCB) of each process keeps track of how many ticks that
process has spent running on the CPU. When the process has been on the
CPU consecutively for g_Quantum ticks (4 by default), then it is
time to evict that process and schedule another one.
We're going to provide system calls so that processes can figure out how much time they've spent on the CPU so far, and how much “wall clock” time has elapsed. Among other things, this will allow processes to compute their own turn-around and wait times. Here's how we do it. (It's probably a good idea to try to recompile after each step, just so you can tell whether you have introduced compiler errors. You will not be able to execute anything until step 6 though.)
-
Open up
a4/include/geekos/syscall.hin your editor, and look for the enumeration of “System call numbers” (starts at about line 40). This is an enumeration of system calls that exist so far in GeekOS. You will see theSYS_PRINTSTRINGandSYS_GETPIDwhich are both used by ourhelloprogram./* * System call numbers */ enum { SYS_NULL, /* Null (no-op) system call */ SYS_EXIT, /* Exit system call */ SYS_PRINTSTRING, /* Print string system call */ SYS_GETKEY, /* Get key system call */ SYS_SETATTR, /* Set screen attribute system call */ SYS_GETCURSOR, /* Get current cursor position */ SYS_PUTCURSOR, /* Put current cursor position */ SYS_SPAWN, /* Spawn process system call */ SYS_WAIT, /* Wait for child process to exit system call */ SYS_GETPID, /* Get pid (process id) system call */ }; -
The order matters here, so do not disrupt any of the existing
entries. But at the end of the enumeration (before the closing
brace), add the following:
SYS_GETCPUTIME,SYS_GETCLOCKTIME. -
Open up
a4/src/geekos/syscall.cin the editor, and look for the functionSys_GetPID(about line 191). This is the implementation of that system call on the kernel side. Duplicate that entire function definition twice to produceSys_GetCPUTimeandSys_GetClockTime. Now, change what those functions return:-
Sys_GetCPUTimeshould returng_currentThread->accumTicks; this is the number of ticks that the process has spent (so far) running on the CPU. -
Sys_GetClockTimeshould returng_numTicks; this is the global variable that counts the total number of ticks since the kernel began running.
-
-
Near the end of
syscall.c, there is a definition of a global arrayg_syscallTable. You must add your two new functions to the end of it. The order of the ''SysBlah'' functions listed here must precisely match the order of the ''SYSBLAH'' identifiers in the enumeration insyscall.h. -
Okay, we're done with the kernel side of things. Now we switch to
the user side, and set things up so that user programs can access
our new system calls. Open up
a4/include/libc/process.hin your editor. Look for the declaration ofGet_PID, and add declarations forGet_CPU_TimeandGet_Clock_Time. (All of them havevoidparameters and returnint.) -
Open up
a4/src/libc/process.cin your editor. The top part of the file has “System call wrappers,” which are defined using a macroDEF_SYSCALL. Basically, this expands to a bit of code that has the user-level function trigger the correct software interrupt, and it tells how to pass the parameters, if any. The first parameter is the name of the function you declared inprocess.h. The second parameter is the identifier you defined in the enumeration insyscall.h. The remaining parameters are the return type and argument list. Use theDEF_SYSCALLstatement forGet_PIDas a template to define the two new system callsGet_CPU_TimeandGet_Clock_Time.DEF_SYSCALL(Get_PID,SYS_GETPID,int,(void),,SYSCALL_REGS_0)
-
At this point, everything on the kernel end and user end should be
set up to use these two new system calls, so let's try it. Open up
hello.cagain, and add these two lines somewhere ''before'' you try to write toVIDMEM:Print("The current time is %d ticks\n", Get_Clock_Time()); Print("I've been on the CPU for %d ticks\n", Get_CPU_Time()); -
Now recompile everything and run it in VirtualBox. When you run
helloat the shell prompt, it should report something like the following. Your numbers may be slightly different. Each time you runhello, the current time should go up. The number of ticks on the CPU will probably always be 0 or 1, because this program isn't doing much and doesn't need the CPU for very long.The current time is 64 ticks I've been on the CPU for 0 ticks
3 Test workloads
Now we're going to instrument a CPU-bound user program so that it keeps track of its own turn-around time. Then we'll run several copies of the program simultaneously, and investigate the effect of changing the quantum (preemption interval) on scheduling.
-
Run your kernel, and at the shell prompt type
computeand press enter. You can try this again with various numeric parameters, as shown. The compute program does some fairly meaningless mathematical computations, and usually reports an answer of zero in the end. What matters for us is not the answer, but rather how long it takes to compute it: larger parameters take longer. You should notice this as you run it, but let's try to quantify it.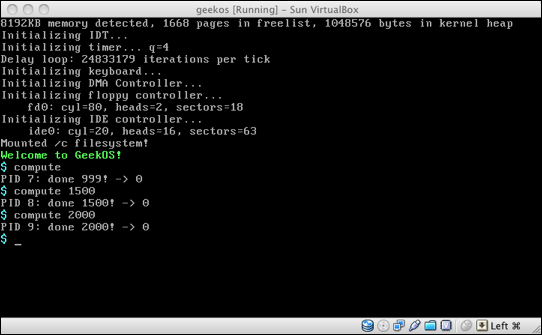
-
Open
a4/src/user/compute.cin your editor. Near the beginning of the program, declare a new integer variable, and initialize it usingGet_Clock_Time(). This records the “wall clock” time at which the process started running. -
At the end of the program, print out the number of CPU ticks used
(retrieved using
Get_CPU_Time) and the amount of time elapsed on the clock. (Computing elapsed time involves subtraction of start time from completion time!) When you have this working, it should look something like the following. Your numbers may be slightly different, but you should noticed that the times increase as the parameter value gets larger. Also, the elapsed time and CPU time should be about the same. This is because we're so far running only one process at a time.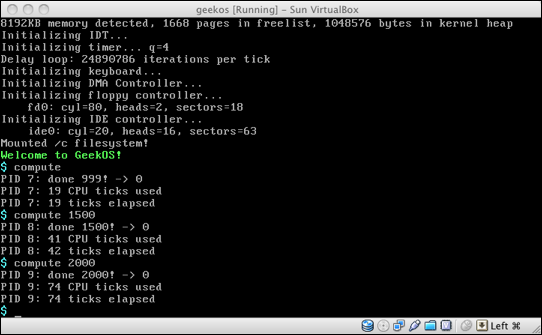
-
Run your kernel, and at the shell prompt, type
work. This is a program that itself runs six copies of the compute program, with a mix of arguments. So you should see six sets of results from compute before getting a shell prompt back. Make a note of the elapsed time of each of the six processes, and compute the average. (You can ignore the CPU times for now.) -
Open up
a4/src/geekos/timer.cin your editor. Look for the definition ofDEFAULT_MAX_TICKS, at about line 38. It should be set to 4. Change it to 8, recompile the kernel, and run the work program again. Recompute the average elapsed time for the six processes. Did it improve, or get worse? -
Repeat the last step, so that you have average elapsed times for
quantum values 2, 4, 8, 16, and 32. Type up your results within
the comment just above
DEFAULT_MAX_TICKSintimer.c. What is the pattern?
That's it, commit all the changes you made to the code and comments!
Operating Systems
Generated Wednesday 9 March 2011 @ 16:20 from ceb330e