Important dates
Meeting 5: (Modules 3–4) Simulated design meeting for assignment 3. Implementation concerns: selecting tools, languages, platforms, and libraries.
Assignment 4 due at 23:59: Advanced version control workbook.
Resources
- Software Engineering Radio, Episode 113: Building Platforms with Jeff McAffer
http://se-radio.net/ - Keynote talk at GHC2011 by Barbara Liskov
- Subversion software manual:
http://svnbook.red-bean.com/ - RapidSVN software:
http://rapidsvn.tigris.org/ - Git book
http://book.git-scm.com/
Notes
Assignment
Advanced version control workbook. This activity involves problem-based learning with a version control system, on branching, tagging, merging, release and patch management, etc.
We’ll work with two version control systems: Subversion (representing centralized version control), and Git (representing distributed version control).
Part A: Set up Subversion software
There are many parts to the Subversion system:
a server, usually needed only by administrators that set up the centralized system. In our case, the server is a
mod_svn, a module of the popular Apache web server.the administrative tool (
svnadmin), also needed only by administrators. This can be used to create new repositories, backup and restore repositories, and other such tasks.the command-line client (
svn), used by developers. It’s helpful to know your way around the command line when using version control, but it’s usually not necessary.independent GUI clients, used by developers, for a slightly friendlier experience. These help you visualize the files and folders in your working copy, and see at a glance which have been modified or which have conflicts. Example: RapidSVN. This is the system we’ll use.
GUI clients that integrate with your operating system. Example: TortioseSVN for Windows, or SCPlugin for Mac. These integrate with your OS file browser, so that when you’re looking at files and folders in your working copy, they have annotations representing their status and you can get a context menu with version control operations.
GUI clients that integrate with your IDE. These are similar to independent clients, but the version control operations can be run from directly within the IDE. This is just a matter of convenience. Example: Subclipse plug-in for Eclipse.
To simplify things, we’ll just go with an independent GUI for this activity. Download and install RapidSVN for your platform. It should work equally well on Windows, Mac, or Linux.
- Windows:
http://www.rapidsvn.org/download/release/0.12/RapidSVN-0.12.0-8051.exe - Mac:
http://www.rapidsvn.org/download/release/0.12/RapidSVN-0.12.0-8051.dmg - Linux: Search for it in your system’s package manager.
Part B: Check out a working copy
Open the RapidSVN application. From the Repository menu, select Checkout. You’ll see a dialog box. You need to provide information in the following fields:
URL:
https://liucs.net/svn/cs633f11This is the location of our central repository.Destination Directory: Use the “…” button and browse to a brand new folder somewhere on your disk (such as in Documents or Desktop). This must be a totally empty folder. You can call it
633workingcopyor, really, whatever you want.Leave the revision settings blank and hit OK.
You will be asked for a username and password. I emailed each of you this information. After you authenticate, you should see “Execute: Checkout” in the bottom pane of the RapidSVN window, a bunch of added files, and then “Ready.”
Investigate the new files and folders that were checked out of the repository. At the top level, you’ll see three folders. This is a standard SVN repository layout, and here’s how they are used:
trunkis the main line of development. The newest changes usually go here.branchesis for alternate lines of development such as for maintenance releases or experimentstagsis for snapshots of development at various milestones or points in time.
Look inside trunk. You’ll see (at least) two .html files and a sub-folder for images. You can also see exactly these folders and files on your disk using your normal file explorer or finder. (And they’ll be easier to open and edit that way.)
Open trunk/index.html in your web browser, and also in an editor such as Notepad, Wordpad, or TextEdit. In the browser, you should see a sample web page template that says “plain & clean” at the top, and has my name on the right side in the section “Undergraduates”. Click my name to open trunk/league.html, which is my page.
Part C: Commit some changes
Now you are going to create a small page for yourself and commit it to the repository. Start in RapidSVN by selecting league.html in the file list (make sure you’re in the folder trunk) and then choosing Modify → Copy from the menu. It will ask for the destination, and just type your username followed by .html (example: bsimpson.html if your username is bsimpson).
You’ll see a new file in the RapidSVN file pane, and the icon beside it will be red, with a plus sign. Red icons indicates changes in your working copy relative to what is in the repository.
Open up your new HTML file in your text editor. Modify the title to be your name instead of mine (look for <h2 class="title">). Then modify the bio to say something about yourself (look for <div class="entry"> a few lines below). Save the file and open it in your web browser.
When you are satisfied with he look of your page, we will commit it to the repository. Back in RapidSVN, with the new file selected, choose Modify → Commit from the menu. You’ll get a dialog asking for a “log message”. This is a bit of text that you use to describe the change you made. It is kept in the repository so you can browse it later. Just type “added my own page” or something like that, and hit OK.
You should see the commit happen in the bottom pane, where it will report a number for the new revision, such as “Committed revision 6.” (You will need continuous network access for most Subversion operations, which is one of the disadvantages of a centralized model.)
If you get an error message along the lines of “working copy out of date,” it means that someone else committed between when you did the checkout and attempted this commit. So you have to get their latest changes before you can commit your own. Choose Modify → Update to bring down the latest changes from the repository, and then try your commit again.
Once you have committed successfully, choose Modify → Update again, and the value in the “Revision” column for each file should reflect the latest revision that you committed.
We’re going to make and commit one more change, but this time we’ll all be editing the same file, so a conflict is likely. Open index.html in your editor and jump down to the Graduates or Undergraduates sections, around line 90. Add a link to your new page as a list item (<li> tag). It should look like this:
<li><a href="league.html">Christopher League</a></li>where league.html should be your filename, and replace my name with yours. This chunk must appear between the <ul> above and the </ul> below. Don’t remove mine or anyone else’s links.
Open index.html again in your browser (or refresh the page) and make sure that your name appears in the right sidebar underneath Graduates or Undergraduates, and that clicking that link takes you to your bio page.
When you’re satisfied, try to commit index.html. This time, it’s possible the commit will fail, if someone else already committed a conflicting change. In that case, do Modify → Update and reopen index.html in your editor. Around the area where you were editing, you may see some “conflict markers,” like this:
  <<<<<<< .mine
    <li><a href="bsimpson.html">Bart Simpson</a></li>
  =======
    <li><a href="lisa.html">Lisa Simpson</a></li>
  >>>>>>> .r8
This shows the conflicting changes. The part between the <<< and === lines is the change you made. The part between === and >>> is the changes others made. It’s your responsibility to resolve the conflict. In most cases, because this is a simple web page, you should just be able to remove the conflict markers (the lines starting with <<<, ===, >>>) and you’ll have everyone’s links intact. Do that and test the page again in your browser.
Once you are satisfied with your fix, mark the conflict as resolved (Modify → Resolve Conflicts in RapidSVN) and try to commit again.
If you didn’t encounter a conflict, maybe you want to create one intentionally, to see what it’s like. Find a friend in the class, and you can both edit the same region of the same file at the same time. (Do this on your own bio page, so it doesn’t affect anyone else who is not participating.) One of you successfully commits first, and the second person will see a conflict when he/she attempts to commit.
To see everyone’s revisions and log messages, select the trunk folder and then choose Query → Log from the menu.
Part D: Merge two branches
Now we’re going to work a little bit with branches. In Subversion, a branch is little more than just a separate folder. Underneath the top-level branches folder, I have created a private branch for each student to play with.
Your branch currently contains a pristine copy of the web site from before everyone was making changes on the trunk. You won’t see your bio page or your link there yet. Instead, let’s make a small change elsewhere, that we know won’t conflict.
Go into branches/USERNAME and open style.css in your text editor. Find the line that starts with #logo a { and look for the color attribute a few lines down. Its current value is #E3564F. Change it to your favorite color, using something like one of these:
    color: blue;
    color: #00f044;
    color: #cc30aa;
Now when you open branches/USERNAME/index.html in your browser, the logo in the upper left should be the color you chose.
Once you are satisfied, commit this change in your own private branch.
Now we’re going to merge the work going on in trunk into your own branch. That should combine the color-change development with the new user pages. Merging in subversion is a somewhat complex process. We have to figure out at what revision your branch diverged from the trunk, and then what revision the trunk is at now.
If you select your branches/USERNAME folder and choose Query → Log, you’ll see the history of revisions. It was r6 where I “created branches for each student.” So revision 6 is our starting point.
Now go back to your trunk folder and look at the largest revision number you see there. You may want to Modify → Update first, in case there’s something even newer. Let’s say this is revision 10. (It will probably be larger than that by the time you read this.)
Select your USERNAME folder underneath branches in the left pane of RapidSVN. Choose Repository → Merge. You’ll see a dialog like this:
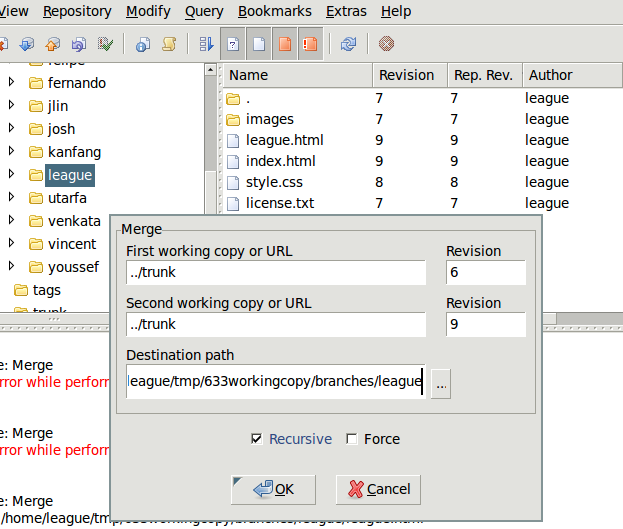
Merge dialog
Enter
../trunkinto both working copy boxes.Enter the start and the latest revision into the revision boxes.
Your destination path should already be your username folder under
branches, but double-check that.
Hit OK and wait for the merge to occur. If there were no errors, you should see several modified files in branches/USERNAME. These are the changes that have been imported from trunk. You still have to commit them.
Once it is all settled, you should have the full web site from trunk in your personal branch, except that the logo color will be your own choice instead of the original one.
©2011 Christopher League · some rights reserved · CC by-sa