Milestone 1
due at midnight on +125
For this milestone, we’re going to gain a little more experience with Java and build a tiny web server application. We will use the Spark framework at http://sparkjava.com/.
Basic Spark project
To get started, create a fresh IntelliJ project named
sparkdemo. Don’t use a project template. Make sure the Project location is a newsparkdemodirectory beneath yourcs164s16repository directory.
Project name and location
Once the new project is open, you can use VCS » Enable VCS Integration, as we did in the Hello project. Commit and push to the Git server as often as you like. When you have a commit candidate that you think is your final submission, please include
#milestone1in the commit message – I will search for that when figuring out what to grade.Now we want to set up the libraries we’ll use. Go to File » Project Structure and select Libraries from the left panel. Then hit the green plus sign in the next column and select From Maven. In the search box, type (or paste)
com.sparkjava:spark-core:2.3and hit the search icon. Once it finds it, you can press OK. Confirm that you want to incorporate the library into yoursparkdemomodule.Repeat those steps to also add the library
com.sparkjava:spark-template-handlebars:2.3.In your
srcdirectory, create a new Java class calledSparkDemo. At the top of the file, before the class declaration, add:import static spark.Spark.*;Inside the class declaration, create a
mainmethod like this:public static void main(String[] args) { get("/hello", (request, response) -> "Hello Spark!"); }Select Run » Run… from the menu, and choose
SparkDemoas the class to run.You should see some output like:
[Thread-0] INFO org.eclipse.jetty.util.log - Logging initialized @437ms
[Thread-0] INFO spark.webserver.JettySparkServer - == Spark has ignited ...
[Thread-0] INFO spark.webserver.JettySparkServer - >> Listening on 0.0.0.0:4567
[Thread-0] INFO org.eclipse.jetty.server.Server - jetty-9.3.2.v20150730
[Thread-0] INFO org.eclipse.jetty.server.ServerConnector - Started ...
[Thread-0] INFO org.eclipse.jetty.server.Server - Started @793ms
The important part is that “Listening on 0.0.0.0:4567” – it indicates that your server is ready to be tested. Switch to any web browser and enter
http://localhost:4567/hellointo the address bar. You should see the “Hello Spark!” message.Your web server continues running until you explicitly stop it using the red square button to the left of the program output. On my system, the stop button changes to a skull, and then you have to press it one more time to really kill the program.
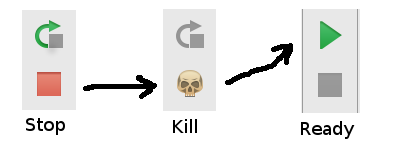
Stop and kill the running server before starting a new one
If you try to run the server again while another instance is running, you’ll see an error message like:
java.net.BindException: Address already in use
Response function
The syntax used in the “Hello Spark” example above is that of a Java 8 higher-order function, also called a “lambda expression”:
(request, response) -> "Hello Spark!"It is a function that takes two parameters: a request object and a response object, and then it returns something, in this case a string. If our function needs to be a little more complex, we can use curly braces and return, as with normal methods. That version would look like this:
    (request, response) -> {
        return "Hello Spark!";
    }
Expand your “Hello” response function as shown, and test it again. In the context of the get statement, it will look like this:
    get("/hello", (request, response) -> {
        return "Hello Spark!";
    });
Now we can begin to do some more complicated things in the response function. Let’s say, for example, we want to count how many times the page is accessed. Add a class variable outside of the main method:
static int counter = 0;Then, your response function can update the variable and use it in the message.
    get("/hello", (request, response) -> {
        counter++;
        return "Hello Spark #" + counter;
    });
Restart the server and test the /hello page again. Each time you reload it, the counter should increment. This counter is only in memory though, each time you restart the server it gets set back to zero. Later on we’ll learn how to have data persist across server restarts.
HTML template
In the previous section, we used Java string concatenation to pull together a constant message with some variable data:
return "Hello Spark #" + counter;As our pages and the data on them get more complex, composing them with Java strings becomes extremely tedious. That’s what HTML templates are for.
There are tons of HTML templating languages, and many are supported by Spark. The one I’m going to recommend is Handlebars. You should have already added the spark-template-handlebars library to your project.
To use a template, we need to make two changes to the code, and then create template files within our project. Let’s do the code changes first.
Instead of returning a string, we’re going to return a ModelAndView object. This pairs together some data with the name of the template to use to display it. Then we also have to specify the template engine to use. Here is the basic format:
    get("/hello", (request, response) -> {
        return new ModelAndView(null, "hello.html");
    }, new HandlebarsTemplateEngine());
If your IDE doesn’t automatically import ModelAndView and/or HandlebarsTemplateEngine, you can manually add:
import spark.ModelAndView;
import spark.template.handlebars.HandlebarsTemplateEngine;
at the top of the file. After restarting the server and reloading the /hello page, you should see “500 Internal Server Error.” For the detailed error message, look in the IntelliJ Run console. It will show something like
org.eclipse.jetty.io.RuntimeIOException:
  java.io.FileNotFoundException:
    /templates/hello.html
So the problem is that we haven’t provided the hello.html file.
Adding the template files properly is a little tricky, so pay close attention to these steps. In IntelliJ, select File » Project Structure from the menu, and then select Modules in the left pane.
The Sources section in the main part of the dialog shows you your file tree. Right-click on the top-level folder (probably called sparkdemo) and select New Folder. Name your folder resources. Once the folder appears, right-click that folder and select Resources. The summary at the right should distinguish the source folder from the resource folder.
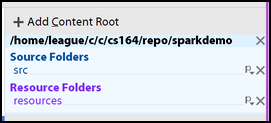
Source and resource folders
You can click OK to dismiss the Project Structure dialog.
Now there should be your resources folder in the project pane to the left. Right-click on that and select New » Directory. Name your directory templates. Then right-click on templates and select New » HTML File. Name it hello.html. It will give you a template template HTML file with a head and body. In the <body> section, add this:
<h1>Hello from my template!</h1>Now, restart the server again and reload the /hello page. You should see the “Hello from my template” heading instead of the 500 error.
Right now, the model we’re passing is null:
new ModelAndView(null, "hello.html");If we want to show some data in the template, we need to provide it there. We’ll use a Java HashMap, which is just a way to associate a key with a value — in this case both key and value will be strings. Within our response function:
    HashMap<String,String> vars = new HashMap<>();
    counter++;
    vars.put("counter", Integer.toString(counter));
    return new ModelAndView(vars, "hello.html");
With that code, we are exporting the Java variable counter into a template variable also called counter. Now we can display the counter value by modifying our template:
<h1>Hello from my template!</h1>
<p>This is access <b>number {{counter}}</b></p>
The double-curly braces are the Handlebars syntax for plugging in a value.
Session
Finally, we’ll experiment with the idea of a session. A session is a way to store some data particular to one user’s browser. The server asks the browser to store a session ID as a cookie. When the browser loads the next page on the site, it sends back the session ID. In this way, the browser can keep track of who is accessing. (That’s what it means to “log in” on a web site.) Spark has facilities for storing and retrieving data associated with the session ID.
Let’s begin in your main program by adding a new response function for the /login path. We’ll let the /login page take a query parameter called user, to specify who is logging in. So you would access /login?user=Alice to log in as Alice, or /login?user=Bob to log in as Bob. (We won’t bother with storing and checking passwords at this stage.)
Here’s the code that would go in main, after your get statement for /hello:
        get("/login", (request, response) -> {
            String user = request.queryParams("user");
            request.session(true);
            request.session().attribute("user", user);
            response.redirect("/");
            return null;
        });
In that code, we get the user parameter from the query string, then we initialize a session at associate user with the session. Finally we redirect to the home page, "/".
You can stop and restart the server, and access the URL http://localhost:4567/login?user=Candice to test it out. Pretty much as soon as you hit enter, the URL will change back to the home page. That’s the result of response.redirect. The home page, though, just displays a 404 (not found) error.
So we need a home page. As with /hello, let’s create a HashMap and an index.html template, and pass the session user name into the template:
        get("/", (request, response) -> {
            HashMap<String, String> data = new HashMap<String, String>();
            String user = request.session().attribute("user");
            data.put("username", user);
            return new ModelAndView(data, "index.html");
        }, new HandlebarsTemplateEngine());
Stop and restart, and now you’ll see the /login?user=Candice URL redirect to a 500 error. That’s because we don’t yet have the index.html template. Create it in the right place, next to the hello.html template.
In the body, add this code:
{{#if username}}

Welcome, {{username}}.
<a href="/logout">Log out</a>

{{else}}

You are not logged in.

<form method="get" action="/login">
    <input type="text" name="user" value="">
    <input type="submit" name="submit" value="Log in">
</form>

{{/if}}
Now if you restart and reload the home page, it should give you a “Welcome, Candice” message with a link to log out. So finally we need to implement the logout. We’ll do this just by removing the user attribute from the session data:
        get("/logout", (request, response) -> {
            request.session().removeAttribute("user");
            response.redirect("/");
            return null;
        });
As before, we redirect back to the home page. This time, it will give you a login form where you can type a user name. With this code, you can log out and log in as different people to your heart’s content.