due at 23:59 on
(A) Install VirtualBox 4
We will use virtual machine software for this course, both to implement the assignments and to run the resulting OS kernel. I have already configured a VM image with all the software we’ll need for this course.
Download my VM image (about 780 MiB) from
https://s3.amazonaws.com/liucs.net/Debian-Spring-12.ovaDownload VirtualBox for your host OS (Windows or Intel Mac) from
https://www.virtualbox.org/wiki/DownloadsInstall VirtualBox. If the installer gives you any trouble, try rebooting.
Run the VirtualBox application. You may just cancel the registration form.
(B) Configure and boot Debian Linux VM
From the File menu, select Import Appliance. Push the Choose button, navigate to your
Downloadsfolder, and select theDebian-Spring-12.ovafile that you downloaded.Click Next, then Finish. The import process can take some time. Once it has finished, you can delete the
.ovafile, and the VirtualBox installer.Now you should have a Debian Linux VM in the left panel of VirtualBox. Before you start it, select it and click the Settings button on the tool bar. In the System section, you may have to reduce the base memory of the virtual machine. It should be no more than 75% of the memory of the host machine. For example, if you have 2G RAM, set the VM base memory to 1024MB (1G). If you have only 1G RAM, set the VM base memory to just below 768M.
Also in the settings, select the Shared Folders section. If there is already an entry called
host, double-click it to edit. If there is no such entry, click the plus-folder icon on the right.For Folder Path, use the drop-down → Other… to bring up the file chooser. Navigate somewhere on your host system (Desktop is convenient) and create a brand new folder called
host. Select that folder for the “Folder Path” in the dialog. For the Folder Name, use just the wordhost(must be all lowercase letters). Select the Auto-mount option.
Shared folder dialog
Apply the settings and start the Linux VM. You may have to dismiss a dialog about capturing the keyboard or mouse; these things should resolve themselves once the VM is running. You should see the Debian start-up screen on a black background, wait a few seconds and then it will proceed with booting.
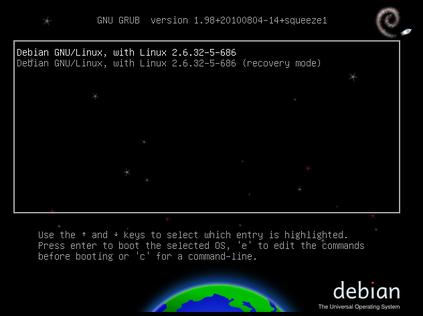
Debian boot screen

Debian boot process
Once the system finishes booting, the login screen should appear. Enter the following user credentials (passwords and user names are case-sensitive):
Username: liucs
Password: LIUcs!@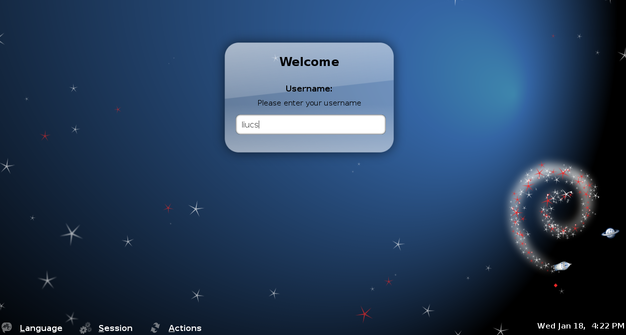
Debian login screen
After a successful login, you should see the Debian desktop. The buttons across the lower left (highlighted yellow in the image below) are an application menu, terminal, editor, file manager, and web browser. In this image, I have started the browser (which is a version of Google Chrome) and the terminal (command prompt).
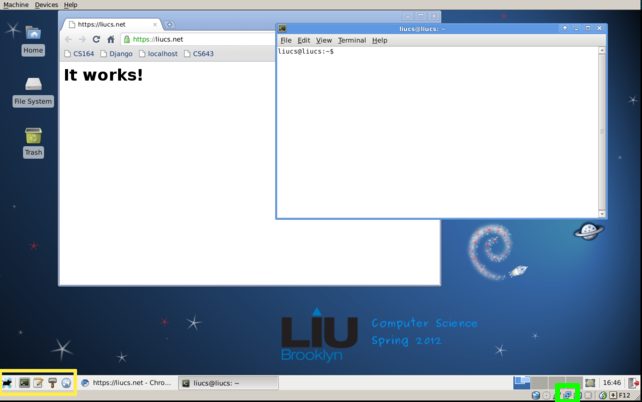
Debian desktop
If your screen has scroll bars or is too small, you can try to select Auto-resize Guest Display from the Machine menu at the top. Your Debian desktop should match the size of the VM window in which it appears.
Make sure that networking works by using the browser (within the VM, not on the host!) to do a Google search. If the network seems to be down (but is working on your physical host machine) then you may have to look for the VirtualBox networking setting (right-click on the two-screen icon in the lower right, highlighted green above) and change it from NAT to Bridged.
Next, we will update your system with some scripts and settings we need to continue. Open a terminal window and type the following. (The dollar sign represents the command-line prompt; don’t type that part!)
$ sudo phonehomeThe command
sudomeans “do the following as the super-user.” It will ask you for your the password for theliucsaccount (which isLIUcs!@as above). The password entry does not echo any characters as you type, but it is accepting input. Just press enter when you are done.The
phonehomecommand connects to my server to run a script that updates your machine’s configuration.It should look something like this:
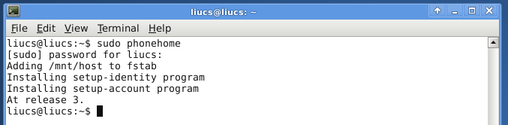
Command-line example
Now we will check that you can connect to the shared folder on your host system. In your terminal, type the following (again, not the dollar sign):
$ sudo mount -aThe command should produce no response at all; that means it worked. (If there is an error, contact me and tell me exactly what it said.) Next, try:
$ touch /mnt/host/testing.txtIf that doesn’t complain, then check the
hostfolder you created on your host machine, and an empty file calledtesting.txtshould have appeared there. You are good to go!Throughout the course, we will use this shared folder to transfer files between the guest (virtual) machine and your host.
Next, you will connect your VM to an account on the server. You should have received an activation code by email to your LIU address. Find that, and then type the command
setup-accountin the terminal. It will go through a process like this:$ setup-account This script will help you set up your VM and server accounts. You should have received an activation code at your LIU address. Enter activation code: 0123-4567-89ab-cdef Enter your full name: Christopher League Enter your email address (does not need to be LIU): christopher.league@liu.edu 1. Storing your SSH private key 2. Storing your identity 3. Writing git config 4. Writing SSH config Your account name is: leaguecPay attention to your account name; you’ll need it later.
If any errors occurred in this section, contact me ASAP, and do not move on to part C. Tell me exactly which step failed, and what happened, with exact error messages. You should learn how to take a screen capture on your system, so that you can capture all the details in long error messages. Telling me “it didn’t work” with no other details will not get the problem solved quickly!
(C) Check out and build GeekOS
On your Debian virtual machine, open up a terminal. We’ll now use
gitto check out the sources for your projects. ReplaceYOURNAMEin the following with your account name (provided to you by thesetup-accountscript).$ git clone git@liucs.net:cs643-YOURNAME.git cs643This will create a folder
cs643within your home directory (calledliucs). You can investigate it in the file manager. It should have another folder calleda1within: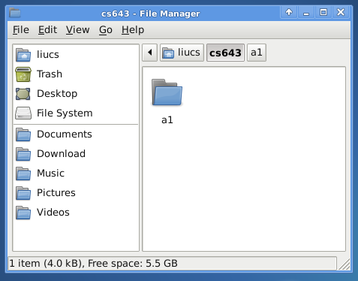
cs643 folder
Now we will build the initial GeekOS “kernel.” Use the following command in the terminal to switch to the build folder for assignment 1:
$ cd ~/cs643/a1/buildType the following command to build the project. It should be done pretty quickly, because the amount of code is tiny (so far).
$ makeHere’s a transcript of a successful build:
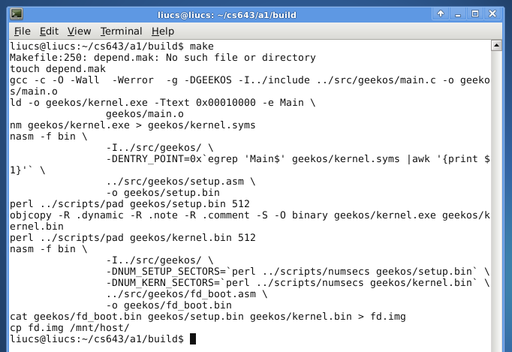
Successful build of a1
If the make completed successfully, then it should have created a file
fd.imgin thebuild/folder, and also copied it to/mnt/host, which means it will appear in yourhostfolder on your physical machine. Look for it now. It should be a small file, just a few kilobytes.
Ensure that you can see fd.img on your physical machine before moving on.
(D) Create a new VM to run GeekOS
What we created in part 2 is a “floppy disk image.” Now we will load that onto a virtual machine, to boot from the floppy disk. The image is tiny because this GeekOS does almost nothing at the moment… it will just initialize the screen, put some colorful text on it, and then sit there in an infinite loop! Let’s try it.
Switch back to the main VirtualBox window, the one with the New, Settings, Start, Discard buttons on the toolbar.
Click New to create a new virtual machine.
Click Next and set the name to
geekos, the OS and version to “Other”, “Other/Unknown.”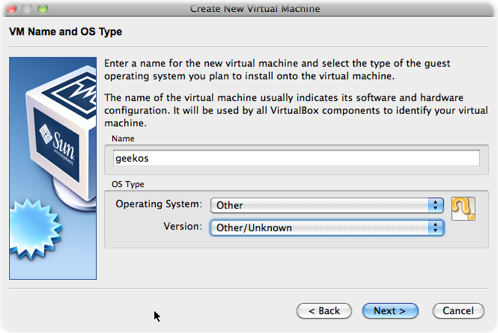
Create new virtual machine
Click Next and set the memory to 8 MB. If it is much larger, we’ll have problems later because GeekOS misinterprets the amount of memory reported by the BIOS, and then crashes trying to initialize it!
Click Next and uncheck the Start-up Disk checkbox. For now, GeekOS will run from the floppy with no other disk. Just like the original IBM PC!
Click Next. We’ll get a warning… confirm your decision to omit a hard disk by clicking Continue. Click Create.
Now we need to attach the floppy disk. With the new
geekosVM selected, push the Settings toolbar button. Go to the Storage section.In the storage tree, under floppy controller, you should see a floppy icon labeled “Empty”. (If you don’t see it, you can add a floppy controller using one of the plus signs at the bottom of the panel.) Click it. On the right side, you should see attribute drop-downs for “Slot” and “Floppy Device”. Beside the device there is a folder icon, click that. (The mouse cursor is pointing to it in the image below.)

VirtualBox storage settings
Note (29 Jan 2012): It has come to my attention that this screen looks a bit different on the latest versions of Virtual Box. You want the disk icon circled in the image below, and then select “Choose a virtual floppy disk file…” You’ll be able to navigate to your
hostfolder and select thefd.imgfile, as in the step below.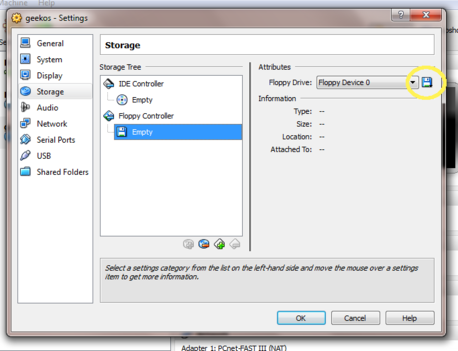
VirtualBox storage settings
You’re now in the virtual media manager. You have to tell VirtualBox where to find your floppy image. Click the add button, then navigate to your
hostshared folder and select thefd.imgfile. Click select to dismiss the virtual media manager. The storage tree should now showfd.imgunder the floppy controller. Click OK to save this setting.Now let’s try it! With the
geekosVM selected, press the Start button on the VirtualBox toolbar. It should show the usual Oracle BIOS screen, and then switch to a black screen with green “Welcome to GeekOS” and a colorful message below.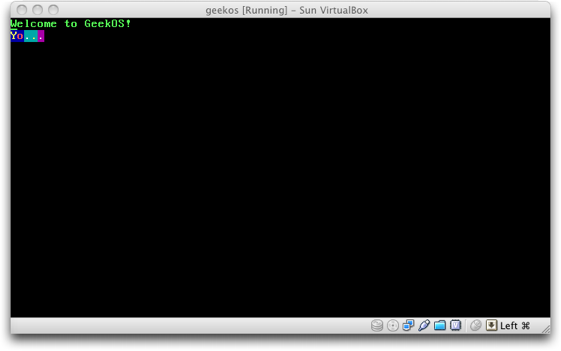
GeekOS welcome screen
Don’t leave the GeekOS running too long, close it and power off the machine. GeekOS doesn’t have the sophisticated power management that the Linux VM does, so it will start to make your computer run hot!
(E) Make a minor change to GeekOS display, test, commit
Now, it’s your turn to hack on the code for the kernel! In the Debian VM, start the gedit text editor application — it’s the icon between the terminal and the file manager, or on the menu under Accessories. In gedit, use File → Open to navigate through the folders cs643/a1/src/geekos and open main.c. You will see a Main function in C that accesses the video memory as an array called VIDMEM.
Using what you learned in class about video memory on PCs (and the sample code in main.c, also shown below in appendix), make the kernel write your name in the center of the screen (horizontally and vertically… it can be approximate). Use at least one color besides gray on black.
After making a modification, you can rebuild GeekOS directly from your editor by selecting Tools → External Tools → Build from the menu, or pressing F5. The output of the build will appear in the lower pane. If there are no errors, then you can immediately switch to the VirtualBox VM screen and start GeekOS to run it with your changes.
Once you are happy with your modifications, you must submit your code using the terminal, as follows. Put your commit message between single quotes.
$ git commit -am 'my first modification to an OS'
$ git push
The first command stores your commit in your own working copy, so you can go back to that snapshot at any time. The second command sends your commit up to the server, where I can access it.
You can commit as often as you want, up to the deadline. In fact, it’s a good idea to commit frequently while you’re working, that way you always have a backup and can use the history features of git. (You can even push changes after the deadline, but I probably will ignore them for the purpose of determining your score.)
Good luck!
Appendix: Code using VIDMEM
From a1/src/geekos/main.c:
  for( i = 0, j = 0;  message[i];  i++, j += 2 )
    {
      VIDMEM[j] = message[i];
      VIDMEM[j+1] = ATTRIB(BLACK, BRIGHT|GREEN);
    }

  VIDMEM[160] = 'Y';
  VIDMEM[161] = ATTRIB(BLUE, BRIGHT|AMBER);
  VIDMEM[162] = 'o';
  VIDMEM[163] = ATTRIB(BLUE, BRIGHT|RED);
  VIDMEM[164] = '.';
  VIDMEM[165] = ATTRIB(CYAN, BRIGHT|GRAY);
  VIDMEM[166] = '.';
  VIDMEM[167] = ATTRIB(CYAN, BRIGHT|AMBER);
  VIDMEM[168] = '.';
  VIDMEM[169] = ATTRIB(MAGENTA, BRIGHT|GRAY);
Appendix: Constants in screen.h
From a1/include/geekos/screen.h:
#define BLACK   0
#define BLUE    1
#define GREEN   2
#define CYAN    3
#define RED     4
#define MAGENTA 5
#define AMBER   6
#define GRAY    7
#define BRIGHT  8
#define ATTRIB(bg,fg) ((fg)|((bg)<<4))

#define NUMCOLS 80
#define NUMROWS 25

#define TABWIDTH 8

#ifdef GEEKOS

/*
 * VGA hardware stuff, for accessing the text display
 * memory and controlling the cursor
 */
#define VIDMEM_ADDR 0xb8000
#define VIDMEM ((uchar_t*) VIDMEM_ADDR)
#define CRT_ADDR_REG 0x3D4
#define CRT_DATA_REG 0x3D5
#define CRT_CURSOR_LOC_HIGH_REG 0x0E
#define CRT_CURSOR_LOC_LOW_REG 0x0F
©2012 Christopher League · some rights reserved · CC by-sa