Software setup
We will need the following software set up on whatever computer(s) you plan to use for this course. It should all work equally well on Mac, Windows, or Linux. These are somewhat ‘bare bones’ instructions, so use Piazza to ask questions if you encounter any problems.
Git and GitLab
Git is a version control tool, that helps developers keep track of any changes that are made to a set of files. We’ll also use it to submit and collaborate on assignments. You may have heard of GitHub, a social code-sharing site. We’ll be using a similar service called GitLab, which more easily allows private code repositories.
Install the Git distributed version control application from http://git-scm.com/downloads. The default settings are fine.
Sign up for an account on GitLab: https://gitlab.com/users/sign_up. Once logged in to your dashboard, create a new private project named
cs120.Open the Git bash application on Windows, or use Utilities » Terminal on Mac. Type these commands, substituting your actual name and email address in the double quotes:
git config --global user.name "YOUR NAME"
git config --global user.email "your.address@example.com"
Create an SSH key pair, assuming you don’t already have one on this computer. To do that, in the Git bash terminal, enter
ssh-keygen. You’ll press enter for all the defaults, including an empty passphrase. It should go something like this:$ ssh-keygen Generating public/private rsa key pair. Enter file in which to save the key (/c/Users/league/.ssh/id_rsa): Created directory '/c/Users/league/.ssh'. Enter passphrase (empty for no passphrase): Enter same passphrase again: Your identification has been saved in /c/Users/league/.ssh/id_rsa. Your public key has been saved in /c/Users/league/.ssh/id_rsa.pub. The key fingerprint is: b7:27:3e:8d:83:df:9a:21:c7:27:0d:fa:43:ac:d0:7e league@WIN7Now you’ll want to access the public part of the key that it generated. It’s easiest to open it in a text editor, using:
- On Windows:
notepad .ssh/id_rsa.pub - On Mac:
open -e .ssh/id_rsa.pub
The editor will pop up with a line that begins
ssh-rsa AAAA… copy the whole thing onto your clipboard.- On Windows:
In your GitLab account, go to Profile settings » SSH Keys » Add SSH Key and paste your key in the big box, then Add Key.
On your computer, open the Git GUI application. Select Create New Repository. In the Directory box, browse to somewhere convenient such as Desktop or Documents, and then manually add
/cs120onto the end (without creating that folder). In my example, the Directory isC:/Users/league/Desktop/cs120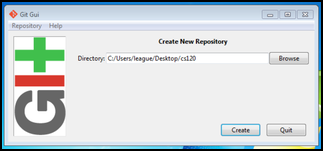
Create New Repository
Mac users: you may not be able to find the Git GUI application. Here is how to proceed.You should now see the repository status viewer. You will interact with this interface whenever you want to save your work and synchronize it to the GitLab server.
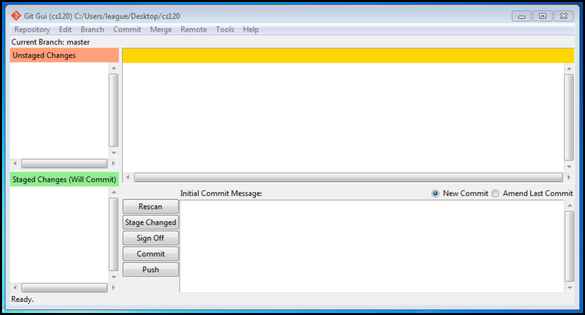
Repository status viewer
Create a new file called
readme.txtand save it within the newcs120folder. In the file, just type your name and whatever else you want.Switch back to the repository status viewer.
Hit the Rescan button. Your
readme.txtshould appear in the upper left area, labeled Unstaged Changes.Hit the Stage Changed button. The app will confirm and move the
readme.txtto the lower left area, labeled Staged Changes.Type a message such as “my initial commit” in the lower box labeled Initial Commit Message.
Hit the Commit button. The status bar at the bottom should say something like “Created commit abcdef: my initial commit.”
Another way to see the commit is to select Repository » Visualize master’s history from the menu. Your commit should be highlighted, and the contents of your readme file will also appear there.

History viewer
After confirming the details, you can close the history viewer.
The next step is to push the new commit up to the GitLab server, which we will configure as a ‘remote’. Go back to your GitLab
cs120project page and find the SSH URL. It should look something likegit@gitlab.com:USERNAME/cs120.git. Copy that onto the clipboard.In the repository status viewer, select Remote » Add from the menu.
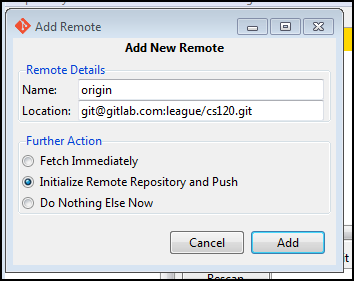
Add New Remote
Type
originas the Name, and paste your git@gitlab… URL as the Location. Select Initialize Remote Repository and Push, and hit Add.A successful push should look something like this:
Not allowed command [ignore this]
Pushing to git@gitlab.com:USERNAME/cs120.git
To git@gitlab.com:USERNAME/cs120.git
 * [new branch]      master -> master
updating local tracking ref 'refs/remotes/origin/master'
Success
Mac users: if the push seems to be taking a while, switch back to the terminal where you started the git GUI. If it’s asking a yes/no question, type ‘yes’ and press enter; then the process should continue.Now, in some text editor, make a small change to the readme file you saved in
cs120– just add a one-line message to it. In the repository status viewer, repeat these steps. We’ll use these whenever you have something new to submit or synchronize:- Rescan button
- Stage Changed button
- Type a Commit Message, such as “added one line to readme”
- Commit button
- Push button
- Confirm the Push in the next dialog.
If you reload the project page on GitLab, you should see a summary of the history, with your most recent commit first: “Christopher League pushed to branch master at Christopher League / cs120 … added one line to readme.”
Congratulations, your Git is working!
JetBrains WebStorm
The main integrated development environment (IDE) we’ll use is called WebStorm, by a company called JetBrains. Their products have licensing fees for commercial use, but are free to students and to open-source projects.
Apply for a JetBrains student account by filling in the form at https://www.jetbrains.com/estore/students/. You must use your
my.liu.eduaddress. Confirm your account by email, and set the password.Download WebStorm from https://www.jetbrains.com/webstorm/ and run the installer.
WebStorm may require Java to be installed first. If so, you can get Java from https://java.com/en/download/ but be careful – by default that installer may also add an annoying toolbar to your web browser. You can and should opt out, and express your anger with Oracle for this nonsense.
Once WebStorm starts, the splash screen will ask you to enter a license key. Instead, select JetBrains Account and enter your email address and password.
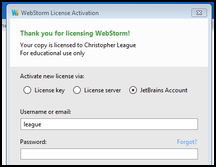
Activate using your JetBrains student account
WebStorm might ask you about importing settings; you can just go with the default.
Then it will display the startup screen. Select Create New Project.
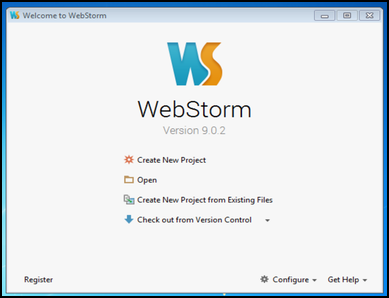
Welcome to WebStorm
Call your project
testpageand, for the Location, make sure it gets saved in yourcs120folder, but in a sub-folder also calledtestpage. In my case, the Location saysC:\Users\league\Desktop\cs120\testpage. The Project type can remain “Empty project.”As the project opens, one of the pop-ups you’ll see says “Unregistered Vcs root detected.” You can try the Add root link and see this should resolve automatically. For the other pop-up, you can choose I don’t agree.
In the project pane on the left side, right-click on testpage and choose New » HTML File. Type the name
index.htmland hit OK. WebStorm might offer to add the file to Git… you can say Yes.WebStorm will have filled in a basic template for your HTML5 page. Inside the
<body>section, add an<h1>tag containing your name, so it looks something like this:<body> <h1>Hello, Chris!</h1> </body>Save the file, and then select View » Open in Browser » [whichever browser] and it should open that browser and show your page. The location bar of your browser will include a host section something like
localhost:63342.Now I want to ensure you know how to take a screen-shot on your OS, because it’s so useful for troubleshooting. If you’re not sure, start at http://www.take-a-screenshot.org/ – save your image as a PNG file, and place or copy it into the
cs120folder. For full credit, make sure it is namedtestscreen.pngand shows just the code portion of your WebStorm window, like this: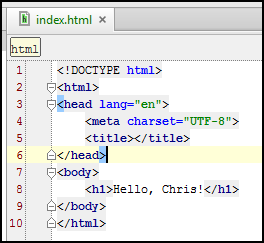
Sample screen-shot from WebStorm
Now choose File » Close project and quit WebStorm.
In your git repository status viewer, do Rescan, and Stage Changed. Make sure that at least
testpage/index.htmlandtestscreen.pngappear in the staged changes list (there will be a few other files within.ideaas well). Type a Commit Message, Commit, and Push.This last step will allow me to see your work. On your GitLab repository page, open up Settings in the left sidebar, and then select Members. Hit the green New project member box, and search for the account named
league. My name should appear. Select that, and add me with access Master, as shown below.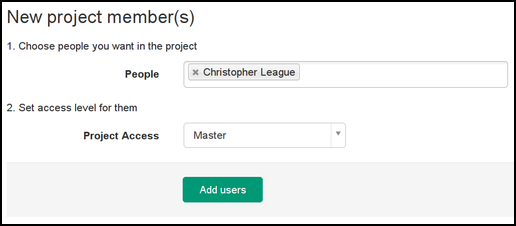
Confirm by hitting Add users.
Congratulations, your WebStorm is licensed and works, you know how to take a screenshot, and you’ve uploaded and shared your work with me.