due at 23:59 on
Again, the following commands will update your repository to the latest code that I may have added:
liucs:~$ cd cs164/bookswap
liucs:~/cs164/bookswap$ git pull
Note: I have altered the format for commands in this handout, so that the prompt is not just a dollar sign, but reveals the user name (liucs) and the current directory. The part you type is still what comes after the dollar sign. This can help orient you if you are not in the correct directory for a particular command.
You should see that the cs164 folder now has a file called evaluation.txt. I will periodically place feedback about your progress on each milestone in this file. You can open the file in the text editor, but try not to make or save any changes to it, as these may lead to conflicts down the road.
Before continuing, make sure you are caught up on Milestone 2. Apart from the instructions there about changing settings.py and liu/models.py, I have placed my version of app/models.py in the notes for 6 February.
If you got stuck on M2:
Here is how you can abandon your changes and continue your project using mine. Do this only if you feel you need it to make progress, or if I advise you to! After finishing this sequence of commands, send me an email to let me know how it went (or report anything that looks like an error).
TODO: revise these instructions, use git merge -X theirs instead
## Use these commands ONLY if you are stuck on M2
liucs:~/cs164$ git commit -am "unsaved changes"
liucs:~/cs164$ git branch -m master m2
liucs:~/cs164$ git checkout -b master solution
liucs:~/cs164$ git push
Step 1 commits any unsaved changes (if there are none, then that’s fine). Step 2 renames your master branch to m2, so you can revert back to your project at Milestone 2 if needed. Step 3 replaces the master branch with my solution branch. Step 4 pushes all these changes up to the server.
Make sure you have admin interface for Book, Listing
To run the server, issue this command in a terminal. I like to use a second terminal, separate from the one where I do other work. All commands that reference manage.py must be performed from the bookswap directory.
liucs:~/cs164/bookswap$ python manage.py runserver
Django displays most error messages in your browser as you access the site, but occasionally the server will fail with an error message in the terminal. Press Control-C at any time to stop the server.
You can access the admin site at http://localhost:8000/admin/ in the browser on your virtual machine. Access the entries for Users, Books, and Listings. If you encounter any database errors (“No such table,” “No such column,” etc.) you may need to rerun syncdb as follows:
liucs:~/cs164/bookswap$ rm -f dbfile
liucs:~/cs164/bookswap$ python manage.py syncdb
(A) Create and save some sample data
Use the admin interface to create about 4 extra users, 5 books, and 8 listings. Try to get a good mix: some books should have no listings, some should have multiple buyers and sellers.
When you are satisfied with your sample data, run the following commands. They will create a directory for fixtures, save your sample data to a file in JSON format, and make sure that file gets included with your next commit. The backslashes in the second command indicate that it is to be typed all as one long line.
liucs:~/cs164/bookswap$ mkdir -p app/fixtures
liucs:~/cs164/bookswap$ python manage.py dumpdata           \
    --format=json --indent=2 auth.User app.Book app.Listing \
    >app/fixtures/sample.json
You are welcome to open up the sample.json file in your editor to see what all your data look like in JSON format.
To verify that the JSON file can restore your sample data, try deleting several records using ‘Action’ drop-down in the admin interface:
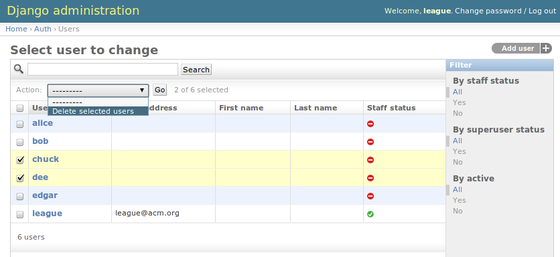
Delete records in admin interface
Then, run the following command to restore them:
liucs:~/cs164/bookswap$ python manage.py loaddata sample
And check that they reappear after a page reload. Once you are satisfied with your sample data, submit it:
liucs:~/cs164/bookswap$ git add app/fixtures/sample.json
liucs:~/cs164/bookswap$ git commit -m "sample data"
(B) Try using the Django DB API
This section is a review of what we learned in class about the Django DB API. You can access the Django Python shell as follows:
liucs:~/cs164/bookswap$ python manage.py shell
Python 2.6.6 (r266:84292, Dec 27 2010, 00:02:40)
Type "copyright", "credits" or "license" for more information.

IPython 0.10 -- An enhanced Interactive Python.
?         -> Introduction and overview of IPython's features.
%quickref -> Quick reference.
help      -> Python's own help system.
object?   -> Details about 'object'. ?? prints more.

In [1]:
You may use Control-D whenever you are ready to exit Python and go back to the regular command prompt.
Within Python, let’s first issue these import statements so we can access our model classes:
from django.contrib.auth.models import User
from liu.models import Course
from app.models import Book, Listing
Create
Creating a new record is as easy as calling the model as a function, and providing the fields as keyword parameters. To save any new or updated record, call use .save()
u1 = User(username='jill', email='jill@acm.org')
u1.save()
After the above commands, you should be able to see the user ‘jill’ in the Users section of the admin interface.
Retrieve
We retrieve records from the database using .objects after the model name. It supports several methods such as all(), get(), and filter(). Let’s investigate those below. In what follows, lines that start with an arrow (→) indicate the Python output.
To retrieve all the records as a list:
User.objects.all()
  → [<User: league>, <User: alice>, <User: bob>, <User: chuck>,
      <User: dee>, <User: edgar>, <User: jill>]
To retrieve any single record, you can use get() and provide the criteria.
User.objects.get(username='bob')
  → <User: bob>

Course.objects.get(prefix='CS', number='164')
  → <Course: CS 164 Software Engineering>
It is an error if your criteria for get() match no records or more than one record:
User.objects.get(username='ralph')
  → DoesNotExist: User matching query does not exist.

Course.objects.get(number='164')
  → MultipleObjectsReturned: get() returned more than one Course
If you want to return multiple (or possibly zero) records as a list, use filter() instead of get(). You can tell these results are lists due to the square brackets [].
Course.objects.filter(number='164')
  → [<Course: CS 164 Software Engineering>,
      <Course: ENG 164 Exploratns in Creative Writng>,
      <Course: HHE 164 Advanced Elective Seminar(Topic: Japanese Family Traditions)>,
      <Course: MUS 164 Jazz Theory / Improvisation IV>,
      <Course: SPS 164 Field Experience>]

User.objects.filter(username='ralph')
  → []
Update
Once you have a database record stored in a Python variable, you can update it by assigning to its fields and then calling save():
c = User.objects.get(username='chuck')
c.email = 'chuck@acm.org'
c.save()
Another example:
k = Course.objects.get(prefix='CS', number='164')
k.title
  → u'Software Engineering'
k.title = 'Hacking for Fun and Profit'
k.save()
You should be able to verify these changes using the administrative interface.
Delete
To delete a record, just call .delete() on it.
u = User.objects.get(username='jill')
u.delete()
There is no output, but again you can verify that it worked using the administrative interface, or by listing all objects again, or by searching with filter():
User.objects.all()
  → [<User: league>, <User: alice>, <User: bob>, <User: chuck>,
      <User: dee>, <User: edgar>]

User.objects.filter(username='jill')
  → []
Foreign keys
Our Listing model uses foreign keys to refer to the Book and User. There are two ways to use foreign keys in queries. First, you can write a double-underscore to jump from the current model to a linked model. For example, let’s suppose that we want to find all listings by the user chuck:
Listing.objects.filter(user__username='chuck')
  → [<Listing: chuck buying 495807348 Intermediate Accounting>,
      <Listing: chuck selling 293750987 CS Illuminated>]
Look closely at that user__username criterion. We put user first because it’s the name of a field in the Listing model. Then the double-underscore links us to the Django User model, which has a field called username. (The results you get will differ, depending on what users, books, and listings you have in your sample data.)
Here’s another example where we look at listings for a particular book, using its ISBN:
Listing.objects.filter(book__isbn='293750987')
  → [<Listing: alice selling 293750987 CS Illuminated>,
      <Listing: bob selling 293750987 CS Illuminated>,
      <Listing: chuck selling 293750987 CS Illuminated>]
The second way to use foreign keys is useful if we already have an object of the linked class. Suppose we have an object representing the user chuck in the variable u:
u = User.objects.get(username='chuck')Then, we can just specify it directly in the user criterion:
Listing.objects.filter(user=u)
  → [<Listing: chuck buying 495807348 Intermediate Accounting>,
      <Listing: chuck selling 293750987 CS Illuminated>]
Exercises
Create a text file under cs164/ called queries.txt. Experiment in the Python shell, and copy your queries for each of the following items into the text file, along with the results you got for your sample data.
Choose one of the books in your sample data that has both buyers and sellers. Create a query to look up seller listings for that book.
For the same book, create a query to look up buyer listings.
Write down the Python code to look up a different book using its ISBN, and to change its edition number in the database.
Choose one of the users in your sample data that has just one listing. Write down the Python code to delete his/her listing from the database.
To submit your queries.txt (note that we’re now in the cs164 directory):
liucs:~/cs164$ git add queries.txt
liucs:~/cs164$ git commit -m "sample queries"
(C) Set up a URL and a view function
This section covers how to attach a URL on our web site to a Python function, called a ‘view’. If you first access http://localhost:8000/test/, you will see the error “Page not found (404).” Add an entry for ^test/ to urlpatterns in urls.py. Here it is in context:
urlpatterns = patterns('',
    # Examples:
    # url(r'^$', 'bookswap.views.home', name='home'),
    # url(r'^bookswap/', include('bookswap.foo.urls')),

    url(r'^test/', 'app.views.test'),

    # Uncomment the admin/doc line below to enable admin documentation:
    # url(r'^admin/doc/', include('django.contrib.admindocs.urls')),

    # Uncomment the next line to enable the admin:
    url(r'^admin/', include(admin.site.urls)),
)
Save that and reload http://localhost:8000/test/. The error should now be “ViewDoesNotExist at /test/.” We’ll create the function in app/views.py:
# Create your views here.

from django.http import HttpResponse

def test(request):
    buffer = ''
    for i in range(10):
        buffer += str(i) + ' '
    return HttpResponse(buffer)
Reload the test page and you should see 0 1 2 3 4 5 6 7 8 9 in the browser.
Make sure you understand how this works: buffer is a string variable that we use to accumulate the results throughout the loop. The plus sign (+) indicates so-called string concatenation – basically, joining strings together. Feel free to modify the strings a bit and see what happens. For example, try:
buffer += ' [' + str(i*i) + '] '(D) Practice python program
Following the same technique as in the last section, create a new URL at test2/ and a new view function test2 in app/views.py.
In your view function, we will collect all the books in your database, and print them out, one per line. You’ll have to import Book just as you did in the python shell:
from app.models import BookYour new function will be similar to test: a buffer variable, a for loop, and a return. However, in the for loop you will iterate over all the books (Book.objects.all()) and update buffer using fields from the current book. To go to the next line in the buffer, add an HTML line-break tag: '<br>'. Your finished test2 page ought to look something like this:
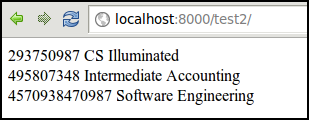
Book list
To submit your work, do the two-step commit and push:
liucs:~/cs164$ git commit -am "my milestone 3"
liucs:~/cs164$ git push
Try git status to make sure no other changes are left unsubmitted:
liucs:~/cs164$ git status
# On branch master
nothing to commit (working directory clean)
comments powered by Disqus
©2012 Christopher League · some rights reserved · CC by-sa