due at 23:59 on
This milestone will make your site “pretty and interactive,” using tools like CSS and jQuery.
Again, the following commands will update your repository to the latest code that I may have added:
liucs:~$ cd cs164/bookswap
liucs:~/cs164/bookswap$ git pull
Before continuing, make sure you are caught up on Milestone 6.
If you got stuck on M6:
Here is how you can abandon your changes and continue your project using mine. Do this only if you feel you need it to make progress, or if I advise you to! After finishing this sequence of commands, send me an email to let me know how it went (or report anything that looks like an error).
- It’s fine if there are no unsaved changes in step 1.
- That’s a Capital
-Xin step 2.
## Use these commands ONLY if you are stuck on M6
liucs:~/cs164/bookswap$ git commit -am "unsaved changes"
liucs:~/cs164/bookswap$ git merge -X theirs origin/solution
liucs:~/cs164/bookswap$ git push
liucs:~/cs164/bookswap$ rm -f dbfile
liucs:~/cs164/bookswap$ python manage.py syncdb --noinput
liucs:~/cs164/bookswap$ python manage.py loaddata sample
After adding the sample data, your admin interface username is admin and the password is admin.
(A) Serve static files
The first step we’ll need is to have our server support static files — data in our project that does not need to be produced by Python scripts. Examples of static files (sometimes also called assets) are CSS files, image files, and Javascript files.
To support static files, we need to add a line in settings.py. Look for the STATICFILES_DIRS section, about line 75. Add the line containing the join call:
# Additional locations of static files
STATICFILES_DIRS = (
    # Put strings here, like "/home/html/static"
    # Always use forward slashes, even on Windows.
    # Don't forget to use absolute paths, not relative paths.
    join(CWD, 'static'),
)
But for this to work, we need to modify something we added previously. Find the two lines that import join and set CWD, and move them to the top of the file:
from os.path import dirname, join
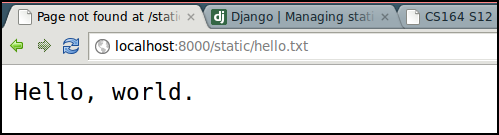
CWD = dirname(__file__) # double underscoresNext, create a new folder underneath bookswap called static. Create a text file in there called hello.txt, with a simple message:

Now, if your server is running, you should be able to load http://localhost:8000/static/hello.txt and see your message in the browser:
(B) Getting the hang of CSS
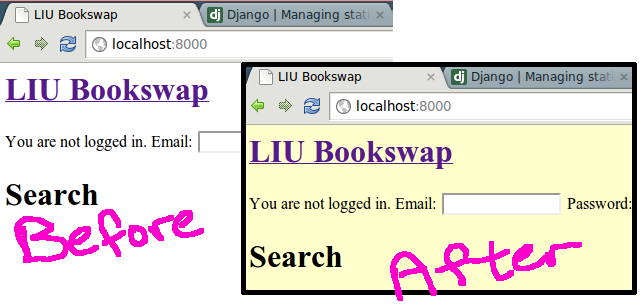
The language we use for adding style information to web pages is called Cascading Style Sheets. Let’s start by creating a text file, static/style.css, with the following content:
body {
  background: #ffffcc;
}
When we link in this style sheet, it will make the <body> element of your page appear with a background that is a pale yellow. To link it in, add this <link> tag to the <head> section of your templates/base.html:
<head>
  <title>LIU Bookswap</title>
  <link rel="stylesheet" href="/static/style.css" type="text/css" />
</head>
Test out your site:
You can find lots of references about CSS online: one example is at W3Schools. The basic idea is that you have a selector, and then braces, and attribute settings in the braces.
In our example, the selector is just body, which matches the entire <body> tag of the page. It’s easy to use selectors named after the HTML tags, like <h1> (two guesses what this does – try it!):
h1 {
  text-align: right;
}
You can also match situations where one tag is nested inside another. For example, my base.html has this code, so that the page title is a link to the home page:
<h1><a href="{% url home %}">LIU Bookswap</a></h1>This is an <a> tag embedded inside an <h1> tag. You can match that in CSS (excluding other <a> tags), like this:
h1 a {
  text-decoration: none;
}
That will turn off the underlining of the hyperlink.
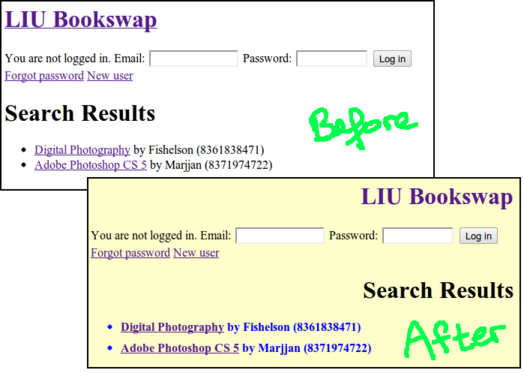
If you don’t want rules to apply to all similar HTML elements, you can add class and id attributes to your HTML to cause them to match specific rules in your style sheet. For example, let’s add a class to the <li> (list item) tag in the search results page, templates/search.html:
{% for r in results %}
<li class="search">
  <a href="{% url book r.id %}">{{r.title}}</a>
  by {{r.authors}} ({{r.isbn}})
</li>
{% endfor %}
You can match that in a CSS rule using a dot (period) connector:
li.search {
  color: blue;
  font-weight: bold;
  margin-bottom: 8px;
}
The results are below:
The id="blah" attribute of HTML is similar, but the idea is that there can be at most one element on the page with that ID. To match an ID in CSS, use the pound sign: h1#blah
One more thing: often, we need to mark parts of the page that should be styled in a particular way, without otherwise having an HTML tag around them. For that purpose, we have the <div> tag. It does no other styling, but allows you to add a class= or id= attribute to any section of the page.
Try this example in one of your templates:
  <div id="box">
    <div class="left">
      Hello
    </div>
    <div class="right">
      World
    </div>
  </div>
and style it like this, in static/style.css:
div#box {
  border: 2px solid red;
  padding: 4px;
}
div.left {
  border: 4px solid green;
  width: 100px;
  float: left;
}
div.right {
  border: 4px solid blue;
}
I added different colored borders to each <div>, to help figure out which was which. You can also see that we’re able to do layouts with different columns this way:

Play around with styling your pages using CSS. Be creative and have fun!
(C) A grid system
In class, we discussed using a grid system to help with the layout of your pages into columns. I’d like you to experiment with this, but it’s okay if you don’t want to use it in the end. The grid system we examined was at http://960.gs/
You can use their custom generator and then download the CSS file. It also goes in the static/ folder, and you can link it in either with another <link> tag in base.html, or within your existing style.css, like this:
@import url("grid.css");(D) jQuery interactivity
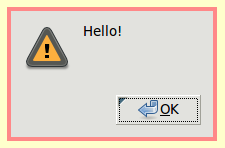
Go to http://docs.jquery.com/Downloading_jQuery#Current_Release and download the latest jquery file (the “minified” version is fine). Save it (or copy/paste to a file) in your static/ folder.
Once in place, you can add some minimal code to the <head> tag of your base.html to link it in:
  <script src="/static/jquery-1.7.2.min.js"></script>
  <script>
   $(document).ready(function(){
     alert("Hello!");
   });
  </script>
Save everything and test this by reloading any page. You should see the ‘alert’ box appear:
If it didn’t work, check that the src= attribute of the script matches exactly the filename you saved in the static folder.
Now we’ll implement the search-completion feature on the title input box of the home page. First, find it in home.html and give it an id. Also add the autocomplete attribute, which turns off the browser’s auto-completion. Then, add an empty <div> block beneath it with its own id. That’s where the search results will go.
Title
<input id="searchtitle" autocomplete="off" name="title" type="text" />
<br />
<div id="searchresult"></div>
Now, replace the test script in base.html with this:
 $(document).ready(function(){
   $("#searchtitle").keyup(function(){
     $.get('/ajax/title', {'q': $(this).val()}, function(data) {
       $('#searchresult').html(data);
     });
   });
 });
Every time the user types a key in the title field, it will send a request to the server and dump the response into #searchresult.
Now we have to implement the server side. Start with something very simple — just add the entry to urls.py:
url(r'^ajax/title', 'app.views.ajaxTitle', name='ajaxtitle'),and to app/views.py:
def ajaxTitle(request):
    q = request.GET['q']
    return HttpResponse('you are here: ' + q)
You can test that directly by going to http://localhost:8000/ajax/title, and you should see the message.
Now, reload the home page and try out your title search box. As soon as you type a character in that field, the message “you are here” should appear beneath it, along with the text you have typed.
It’s up to you to modify the ajaxTitle view so that it returns some actual search results as the user types.
Submit
We added several new files this time, so you have to tell git to record them. Try git status to find out the names untracked files.
liucs:~/cs164/bookswap$ git status
# On branch master
# Changes not staged for commit:
#   [...]
# Untracked files:
#   (use "git add <file>..." to include in what will be committed)
#
#   static/style.css
#   [...]
liucs:~/cs164/bookswap$ git add static/style.css
[repeat for all untracked files]
liucs:~/cs164/bookswap$ git commit -am "Milestone 7"
liucs:~/cs164/bookswap$ git pull
liucs:~/cs164/bookswap$ git push
As usual, you can commit as often as you like. It’s a nice way to checkpoint your work as you make progress, and you can always get back to one of your commits. Pushing periodically adds the advantage of saving a backup copy of everything on my server, and allows me to see your progress or help solve problems.
Good luck!
comments powered by Disqus
©2012 Christopher League · some rights reserved · CC by-sa