ListView
This page is about how to use the ListView widget. It provides automatic scrolling through a list of items, where you can customize how each item is displayed.
Here’s the XML of what I added to my fragment_main.xml file:
    <ListView
            android:layout_width="fill_parent"
            android:layout_height="wrap_content"
            android:id="@+id/listView"/>
I then created single_row.xml, also in the layout folder. Its layout is what will be used for each row in the ListView.
<?xml version="1.0" encoding="utf-8"?>
<LinearLayout xmlns:android="http://schemas.android.com/apk/res/android"
              android:orientation="horizontal"
              android:layout_width="fill_parent"
              android:layout_height="match_parent">
    <ImageView
            android:layout_width="wrap_content"
            android:layout_height="wrap_content"
            android:id="@+id/imageView"
            android:src="@drawable/config_users"
            android:layout_gravity="center_vertical"/>
    <TextView
            android:layout_width="fill_parent"
            android:layout_height="wrap_content"
            android:textAppearance="?android:attr/textAppearanceLarge"
            android:text="Large Text"
            android:id="@+id/textView"
            android:layout_marginLeft="8dp"
            android:layout_gravity="center_vertical"/>
</LinearLayout>
Array of strings
The simple case: just display a list of strings. In onCreateView:
    // Create an array containing the items for our list
    String[] data = new String[80];
    for(int i = 0; i < data.length; i++) {
        data[i] = "Item " + (i+1);
    }
    // Create an array adapter, specifying the layout and the
    // ID of the text view within that layout.
    ArrayAdapter<String> aa = new ArrayAdapter<String>(
            getActivity(), R.layout.single_row, R.id.textView, data
            );
    // Grab the list view and give it our adapter.
    ListView lv = (ListView)rootView.findViewById(R.id.listView);
    lv.setAdapter(aa);
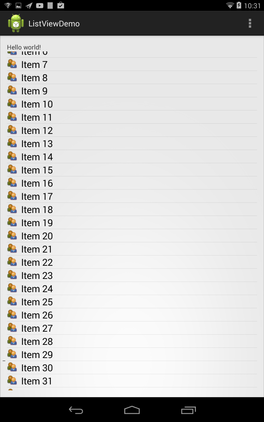
Scrolling through a list of 80 items
Responding to user clicking on a list item (also in onCreateView):
    lv.setOnItemClickListener(new AdapterView.OnItemClickListener() {
        @Override
        public void onItemClick(AdapterView<?> parent, View view, int position, long id) {
            Log.i("ListView", "You clicked #" + position);
        }
    });
Custom Adapter
We ultimately wanted to display a list of menu items with appropriate icons beside each one. That was a little trickier because it requires a custom adapter instead of the default ArrayAdapter.
A menu with distinct icons for each item
First I created this tiny class to represent pairing a menu label with its icon (represented as a drawable resource ID):
public class IconItem {
    public int drawable;
    public String label;
    public IconItem(int drawable, String label) {
        this.drawable = drawable;
        this.label = label;
    }
}
Next, here is the custom adapter class. Its getView method refers explicitly to the textView and imageView IDs in our single_row.xml layout, above.
public class IconArrayAdapter extends ArrayAdapter<IconItem> {

    private int rowLayout;
    private IconItem[] items;

    public IconArrayAdapter(Context context, int layout, IconItem[] data) {
        super(context, layout, data);
        this.rowLayout = layout;
        this.items = data;
    }

    @Override
    public View getView(int position, View convertView, ViewGroup parent) {
        LayoutInflater inflater = (LayoutInflater) getContext()
                .getSystemService(Context.LAYOUT_INFLATER_SERVICE);
        View rowView = inflater.inflate(rowLayout, parent, false);
        IconItem item = items[position];
        TextView textView = (TextView) rowView.findViewById(R.id.textView);
        textView.setText(item.label);
        ImageView imageView = (ImageView) rowView.findViewById(R.id.imageView);
        imageView.setImageResource(item.drawable);
        return rowView;
    }
}
To use the custom adapter, we give it an array of IconItem objects (this from onCreateView):
    IconItem[] items = {
            new IconItem(R.drawable.config_users, "Friends"),
            new IconItem(R.drawable.kcalc, "History"),
            new IconItem(R.drawable.kfm, "Log"),
            new IconItem(R.drawable.kedit, "Profile")
    };
    IconArrayAdapter aa = new IconArrayAdapter(getActivity(), R.layout.single_row, items);
    // Grab the list view and give it our adapter.
    ListView lv = (ListView)rootView.findViewById(R.id.listView);
    lv.setAdapter(aa);
All of the drawables referenced are 24×24-pixel icons I took from the “Tango” UI set on Linux, but you can find similar stuff in lots of places.
config_users.png
kcalc.png
kedit.png
kfm.png
Create a new folder app/src/main/res/drawable/ (if you don’t already have it), and place your icons there.