Software setup
We will need the following software set up on whatever computer(s) you plan to use for this course. It should all work equally well on Mac, Windows, or Linux. These are somewhat ‘bare bones’ instructions, so use Piazza to ask questions if you encounter any problems.
Git setup
Git is a version control tool that helps developers keep track of any changes that are made to a set of files. We’ll also use it to submit and collaborate on assignments. You may have heard of GitHub, a social code-sharing site. We’ll be using a similar site, but on a private server.
Create an account at https://git.liucs.net/ (lower right panel). You’ll have to use your LIU email address to sign up. You should receive the confirmation link within a few minutes, but check your junk folder too. After completing the registration, you can set a different email address in your profile, if you prefer.
Download the Git tool for your platform at https://git-scm.com/downloads and run the installer. The default settings should be fine.
Open the Git bash application on Windows, or use Utilities » Terminal on Mac. Type these commands, replacing your actual name and email address in the double quotes:
git config --global user.name "YOUR NAME"
git config --global user.email "YOUR.ADDRESS@EXAMPLE.COM"
If you know you already have an SSH key pair, you can skip this step. Otherwise, in the Git bash terminal enter
ssh-keygen. You’ll press enter for all the defaults, including an empty passphrase. It should go something like this:$ ssh-keygen Generating public/private rsa key pair. Enter file in which to save the key (/c/Users/league/.ssh/id_rsa): Created directory '/c/Users/league/.ssh'. Enter passphrase (empty for no passphrase): Enter same passphrase again: Your identification has been saved in /c/Users/league/.ssh/id_rsa. Your public key has been saved in /c/Users/league/.ssh/id_rsa.pub. The key fingerprint is: b7:27:3e:8d:83:df:9a:21:c7:27:0d:fa:43:ac:d0:7e league@WIN7Now you’ll want to access the public part of the key that it generated. It’s easiest to open it in a text editor, using:
- On Windows:
notepad ~/.ssh/id_rsa.pub - On Mac:
open -e ~/.ssh/id_rsa.pub
The editor will pop up with a line that begins
ssh-rsa AAAA… copy the whole thing onto your clipboard.- On Windows:
Log in to your git.liucs.net account. From the left menu, select Profile Settings, then SSH Keys. Use the green button Add SSH Key and then paste your public key into the big text box. The title should populate automatically when you click it. If not, just enter “my key” or a nickname to identify your computer, like “my Dell laptop.” Click the green Add Key button to save it.
Go back to your GitLab project dashboard. Click the green New Project button. In the project path box, enter
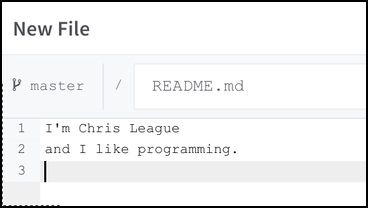
cs664s16(all lower-case, no spaces). Keep the visibility level private, then confirm with the green Create Project button.Your new project page will say “The repository for this project is empty.” Click the adding README link below that. You’ll be placed in a text editor with the title “New File.” Type your name and something about yourself:
Add new README file
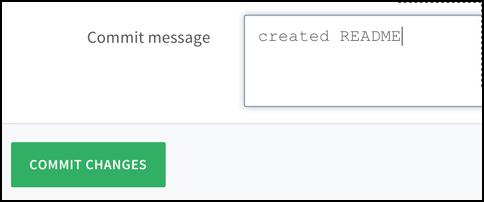
Below the editor is space for a Commit message. In that box, type “created README,” then click the green Commit Changes button.
Specify message and commit changes
Next, while looking at your project page, click the Members item in the left panel. In the People box, type
leagueand select the one just namedleague, with my picture. Change the Project Access drop-down to Developer and then click the green Add Users to Project button.
Java SDK setup
We will need the Java Software Development Kit (JDK), ideally version 8: http://www.oracle.com/technetwork/java/javase/downloads/index.html
You may already have a Java Runtime Environment (JRE) if other applications on your system require it, but that is not enough. Unless you have programmed in Java on this system before, chances are you’ll need to install a JDK from scratch.
On the next page, you’ll need to accept the license agreement, and then you can find the download link for your platform — probably Windows x64 or Mac OS X. Go through the Oracle setup wizard; all the defaults are fine. At this point you may be redirected to a web browser to register with Oracle. That is completely optional.
IntelliJ setup
IntelliJ IDEA is a sophisticated development environment for Java and other languages. It also integrates with Git and other version control tools. You can either use the Community Edition for free, or register your .edu address with JetBrains to get a free 1-year license for the Ultimate Edition. Apply at https://www.jetbrains.com/student/
Download IntelliJ from https://www.jetbrains.com/idea/. Run through the installer. The default settings should be fine.
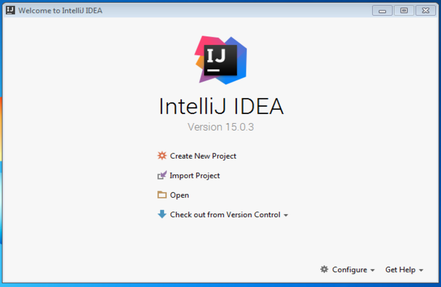
Start the IntelliJ IDEA program. The first dialog will ask whether to import settings; select “I do not have a previous …”
There are a few more screens about the UI theme and default plugins. Again, you shouldn’t need to tweak anything, so just skip all.
Now you should see the IntelliJ welcome screen.
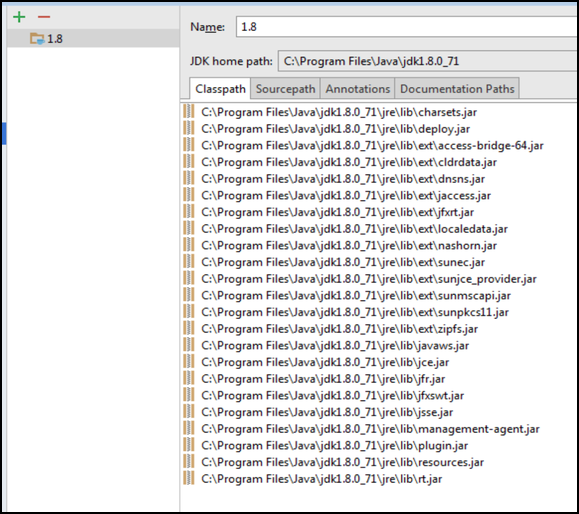
In the lower right, select Configure » Project Defaults » Project Structure.
In the left navigation bar, select Platform Settings » SDKs. Click the green plus
(+)sign in the next column and select JDK. It might open to the correct folder where your JDK was installed, but if not you can look in the following places.- On Windows:
C:\Program Files\Java\jdk1.8.X_YY - On Mac:
/Library/Java/JavaVirtualMachines/jdk1.7.0_25.jdk - On Linux:
/usr/lib/jvm
If you can’t find it, post the details about your OS to Piazza. A successful configuration will look something like the following. Hit OK.
- On Windows:
Hello, world
Now we will create a small Java program, and upload it to the git server.
From the IntelliJ welcome screen, select Check out from Version Control » Git.
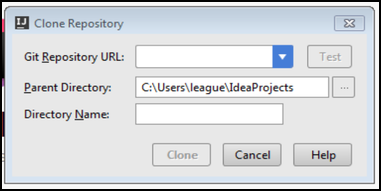
For the Git Repository URL, you will want to copy that from your https://git.liucs.net/ project page. Use the SSH version, which looks something like
git@git.liucs.net:USER/PROJECT.git.
The Parent Directory can be wherever you want, but make it easy to find. The Directory Name should be populated automatically, but you can adjust it if you wish.
When you proceed with cloning the Git repository, the first time it may ask you to confirm the server fingerprint: You can say yes.
Connecting to a new host git.liucs.net:22 that has the key c8:22:53:81:74:9b:6d:32:a5:40:a8:35:12:db:f4:5c (type ssh-rsa). Do you want to add this host to known hosts database?
It should download the repository, then ask “Would you like to create an IDEA project for the sources you have checked out” – this time, say no.
Now we’ll create a new project and save it in the Git directory that we cloned. Back on the IntelliJ welcome screen, select Create New Project. Make sure Java is selected in the left panel and the Project SDK is filled out (Java version 1.8). You don’t need any additional libraries or frameworks now. Hit Next.
On the next screen, you can select Create project from template, and use the template Command Line App. Hit Next.
For the Project name, type
hello, and then – this is important – change the Project location so it appears underneath your cloned directory. For example, instead ofC:\Users\NAME\IdeaProjects\hellochange it toC:\Users\NAME\IdeaProjects\cs664s16\hello– keep thehelloat the end, but insert the Git directory before it.For the Base package, you can leave it as is or insert a different reversed-domain name, like
edu.liu.cs664s16ornet.liucs. Hit Finish. IntelliJ will confirm thathellodoesn’t exist – that’s good, Hit OK.You are provided with a
Main.javafile. Insert one line of code so it looks something like this:package com.company; public class Main { public static void main(String[] args) { // write your code here System.out.println("Hello, cs664s16!"); } }To build and execute your program, select Run » Run Main from the menu. It should display your message in a panel at the bottom.
Now we’re going to commit and upload the code. Select VCS » Enable VCS Integration from the menu. Then choose Git from the drop-down and OK.
Next use VCS » Show Changes View. The panel at the bottom will show “Unversioned Files.” Right-click on it and select Add to VCS.
Now you can do VCS » Commit Changes. Write a brief message in the box labeled Commit Message – you want to describe what you are adding or changing, so something like “created hello program” will do.
At the bottom of the dialog, select Commit and Push. It may pop up a separate dialog where you confirm the Push.
Back on the https://git.liucs.net/ web site, if you load the activity page for your project it should say something like “YOUR NAME pushed to branch master … less than a minute ago.” Your code is uploaded to the server!
As you continue to work in IntelliJ, whenever you create a new file it may ask you whether to add it to Git. I recommend always saying Yes. Then there will be fewer “Unversioned Files” for you to add in the next commit.